> For the complete documentation index, see [llms.txt](https://elijahchia.gitbook.io/ctf-blog/llms.txt). Markdown versions of documentation pages are available by appending `.md` to page URLs; this page is available as [Markdown](https://elijahchia.gitbook.io/ctf-blog/greyhats-welcomectf-24/ee2026-misc.md).
# EE2026 (misc)
Hardware challenge requiring vivado and some understanding of circuit schematics.
Challenge Description
{% file src="/files/dasUXLwSwzF9YErGmtOT" %}
The challenge author provides us with a folder containing a bunch of files. This seems to be his submission for some EE (Electrical Engineering) assignment. The most important file given is the pdf file, which describes the assignment.
The assignment starts off by telling us the format of a student identification number. It starts with a one-digit value `A`, followed the personal password which is 5 characters containing digits padded with the letter `X`, followed by an alphabet `B` and ending with the digit `C`. For example, if `A=1`, `personal password = 1234X`, `A='B'` and `C=0`, then the ID no. would be `11234XB0`. Note that the digits in `B` must be sorted and it cannot have duplicate digits.
The assignment requires the student to program a basys3 board with several requirements.
Firstly, when the 16 active-high switches SW0-SW15 are off during initialisation, all active-high LEDs LD0-LD15 should be off. Based on the value `A`, we desire the following display on the 7 segment display of the board:
Desired 7 segment display based on A
Secondly, whenever any of the switches `SW0-SW9` are on, their corresponding LEDs `LD0-LD9` should also turn on. `LD10-LD14` should not have any constraints.
Thirdly, the switches SW0-SW9 represent a user's "guesses" of the 5-character password `B`. For example if the password is `1234X`, then turning `SW1-4` on and leaving `SW5-9` off is correct. When the guess is correct, `LD15` should turn on. `LD15` should be off if the combination of on switches is wrong.
Lastly, when the correct password is entered, the 7 segment display should show the following depending on the alphabet `B`:
Goal state of 7 segment display based on B
When the correct password is entered, the anodes on the 7 segment display which light up should be the following depending on the digit `C`. What are anodes? We will get to this later.
So we have to somehow reverse engineer the given files to find out what student number is the correct input for a particular basys3 board design.
Looking through the files, some of them are `graded_post_lab_assignment_1.xpr`, `vivado.jou`, `vivado.log`, `basys3_constraints.xdc` and we also have `.dcp` files.
Upon further research, this appears to be a design project done using vivado. So we need to install vivado in order to analyse the author's project.
To open it in vivado, simply go to `Open Project` and choose the `.graded_post_lab_assignment_1.xpr`file.
The initial project which vivado shows us isn't helpful for solving the challenge (I think).
In order to view the circuit design we need to go to `Flow > Open Implemented Design > impl_1...` first which shows us the following:
This still doesn't seem to be very meaningful, so after poking around a bit I eventually went to `Tools > Schematic` which shows a very nice schematic of the circuit board design. I broke it into 3 pictures since it's too big:
We already know that `SW` stands for switches and `LD` stands for the LEDs on the board. But what are the alphabets `A-G`, `OBUF`, `IBUF`, `AN`, `LUT5` and `LUT6`? After researching abit on this board, I came to realise the following:
* `LUT5` and `LUT6` are simply programmable Look-Up Tables which we can change the logic of.
* `OBUF` and `IBUF` are output and input buffers and we don't need to care much about them.
* The different `ANx` values and the alphabets `A-G` represent different components of the 7 segment display according to the figure below:
7 segment display diagram
-> The anodes `AN0-AN3` each represent a different digit in the seven-segment display, so each account for a quarter of the display.
-> The letters `A-G` in the schematic represent the 7 different parts of a digit in the seven-segment display.
After more research, I found that:
* To get a certain part of the display to light up, for example anode 1 segment G, the schematic's input to AN1 needs to be 0 and the schematic's input to the cathode G needs to be 0 (both active low).
* As mentioned above, the LEDs and switches are active-high (on switches output a 1, which turns an LED on).
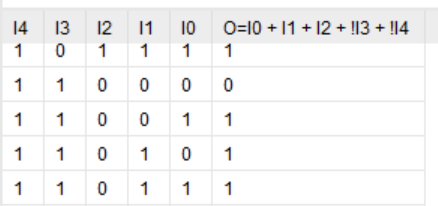
As for the LUTs, the `Cell Properties` window has a tab called `Truth Table`. This shows us the output of each LUT given certain inputs. For example, for the top LUT5 we have this truth table (this is just part of it. The whole truth table has $$2^5=32$$ rows):
Top LUT5 truth table
It appears that for this LUT5, the only way for the output to be `0` is for `I4=I3=1` and `I2=I1=I0=0`.
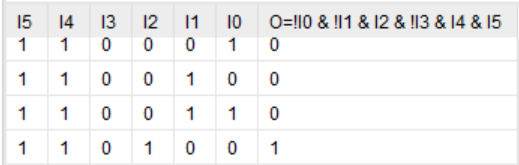
For the LUT5 below we have this truth table excerpt:
Bottom LUT5 truth table
So having `I4=I3=I2=0` and `I0=I1=1` is the only way to output a `1`.
For LUT6 we have only one row outputting a `1`:
LUT6 truth table
Now that we have understood the logic, we can find the digit `A` by imagining what the 7 segment display would show if all switches SW0-SW9 were turned off. Looking at the bottom-right of the schematic, we know that `AN3=A=E=0` forever as they are all grounded. We also know that `B=F=1` forever as they are always powered.
Tracing the rest of the 7 segment display components, the output of LUT6 would be `0`, the output of the top LUT5 would be `1` and the output of the bottom LUT5 would be `0`. Therefore `AN0=C=1` and `AN1=AN2=D=G=0`. Hence out of the four anodes, `AN1, AN2, AN3` would light up, and the segments lit up would be `A, D, E, G`. Referring to the 7 segment display again, this configuration corresponds to `2`. So the first digit of the ID number is `2`.
Now let's find out the 5 characters in personal password. To do this, we have to figure out which combination of `SW0-SW9` would turn `LD15` on. This means that the output of the bottom `LUT5` must be `1`. The corresponding inputs should be `I4=I3=I2=0` and `I0=I1=1` (as mentioned above). This means that we must have `SW0=SW7=SW9=0` so they should be off. `SW8=1` so switch 8 should be on, and the output from `LUT6` should be `1`. If the output from `LUT6` should be `1` then `LUT6`'s `I2=I4=I5=1` and `I0=I1=I3=0`. This means that `SW1=SW2=SW4=1` and `SW6=SW5=SW3=0`.
-> Thus to produce the correct output we should only turn on switches 1, 2, 4 and 8. Hence the 5-char password is `1248X`.
Now let's solve for alphabet `B`. To figure this out, we need to know which of the 7 segments display's segments are on (the segment's input is `0`) when the correct password is entered. We know that when the correct password is entered, the top `LUT5` outputs `0`. So `C=0`. The bottom LUT5 would output `1`, so `D=G=1`. And we know that `B` and `F` are always `1`, while `A` and `E` are always `0`. So we need to see which alphabet `B` has the segments `A, E, C` on. This turns out to be the alpabet `G`.
Lastly, let's solve for the value `C`. To find this we need to find out which anodes are on (`ANx=0`) when the correct password is entered. Since the top `LUT5` outputs `0`, `AN0=0`. Since the bottom LUT5 outputs `1`, `AN1=AN2=1`. And `AN3=0` as it is always grounded. So `AN0` and `AN3` would be on. Hence the last digit is `8`.
Putting everything together, the 8-character ID would be `21248XG8`. The flag is therefore `grey{21248xG8}`.